


Difficulty,然后自己思考一下解题思路。如果解不出来,就记下在哪里卡住了,难点在哪。Solution,就看Solution,没有的话就点Discuss,按Most Votes排序,看排名最高的解法。附上自己总结的几条经验:
先刷两个Top专题。Leetcode 上有个List选项,里边有两个专题,分别是Top 100 Liked Questions和Top Interview Questions。这两个List中有很多重复的题,加起来一共150道左右。都是经典的题目,将这150道刷完基本上所有的题型都见过了,而且多数经典题目都会涉及,是提升最快的一个方法。
注意记录、总结与复习。自己写过的代码一定要保存下来,刷题的时候也要记下主要思路和注意点,这样在复习的时候也能对比发现自己哪里还能改进,之前犯得错误有没有重犯。可以将相互关联的题目对比着一起看,方便总结与记忆。一定要时常复习刷过的题,复习比一味的追求数量更重要。
做好Easy,没必要死扣Hard。LeetCode上很多Easy的题目看似简单,实则想要写出Perfect的代码并非易事。多思考如何优化Easy,Medium的解法实际上比花精力解Hard题更能提高自己。况且面试的时候Hard被问的概率太小了。
切忌眼高手低。不要想着自己知道思路解法了就是会了,一定要亲自Coding,手撸出来。我在刷的过程中就经常在Debug的时候才发现自己忘记考虑了某些条件。不把代码写出来,只看别人的答案对自己是没有多大的提高的,只有亲自AC了题目,才能算做过一道题。
最后附上我的刷题仓库,欢迎Start https://github.com/mJackie/leetcode
]]>第一次面试实习第一次当学生干部第一次做数据挖掘比赛第一次投论文除了工作与学习,这一年来业余时间的两大爱好健身和台球也都有进步。水平是一点一点进步的,不可能一口吃个胖子。感谢自己这一年以来能够坚持健身,虽然还不够系统,中间也断断续续,但已经可以明显感觉到自己体质的提升了,感谢胖虎和卡戴珊。今年还学会了游泳,第一次在深水区游泳,第一次在海里游泳。
今年读的书有点少了,印象最深刻的是最近还在读的《邓小平时代》。几年前就看过一些,当时没有坚持读完,感觉像是在写流水账。今年重看时已经发现作者不加评论与主观态度正是这本书的优点所在,只陈述事实,背后的缘由与因果由读者自己思考体会。借着改革开放40周年,发自内心的感受到邓小平的伟大。《通往财富自由之路》也很不错,虽然书名有些俗,每次拿着这本书的时候都被别人嘲笑。
今年发现了一名自己非常喜欢额歌手——满江,声音温暖而有力量,《Mr.Man》、《阳光下》非常好听。《知识就是力量》这个节目很不错,从头到尾追完了。
总的来说,自我感觉这一年能量密度还是很高的,不管是专业知识的学习,还是思想上的一些变化。但仍有许多做的不够好的地方:回所以后没有按时早起;在所里工作效率有点低,老跑神;时间分配做的不好,特别是在多任务的情况下。
最后写几个明年的目标和计划吧:
入口程序为 server.pl , 启动web服务,监听端口,轮训请求,两个主要函数如下:
sub ServerInit
{
    my $group = shift;
    my $server_sock = undef;

    if($group eq "GUI")
    {
        $server_sock = &guiServerInit($ServerParams->{CONFIG});
        GuiServer->removeShm();
    }
    elsif($group eq "PKTGEN")
    {$server_sock = &pktgenInit($ServerParams->{CONFIG});}
    elsif($group eq "CLUSTER_TEST")
    {$server_sock = &clusterMasterInit($ServerParams->{CONFIG});}
    elsif($group eq "ATTACKENGINE")
    {$server_sock = AttackEngineServer::init($ServerParams->{CONFIG});}

    if( defined($server_sock) )
    {$ServerParams->{"$group"}->{"socket"} = $server_sock;}
    else
    {
        printf("Can not setup $group socket at--[%s, %s]\n", __FILE__, __LINE__);
        return 0;
    }
    $ServerParams->{"SELECT"}->add($ServerParams->{"$group"}->{"socket"});

    return 1;
}


sub mainLoop
{
    my @ready;
    my $sock;
    my $sel = $ServerParams->{"SELECT"};
    my $GUIConnections = $ServerParams->{"GUI"}->{"connections"};
    my $PKTGENConnections = $ServerParams->{"PKTGEN"}->{"connections"};
    my $ATTACKENGINEConnections = $ServerParams->{"ATTACKENGINE"}->{"connections"};
    my $CLUSTERConnections = $ServerParams->{"CLUSTER_TEST"}->{"connections"};
    my $STATConnections =  $ServerParams->{"PKTGEN"}->{"connections"};
    my $tmpSock;
    my $tid;
    #starts looping
    while(1)
    {
        #select: BLOCK, selection loop may be interrupted by signals.
        @ready = $sel->can_read();

        foreach my $fh (@ready)
        {
            if($fh == $ServerParams->{"GUI"}->{"socket"})
            {
                #accept the connection
                $sock = $fh->accept();
                #setup buffer for this connection
                $GUIConnections->{"$sock"} = {
                    "buffer" => ""
                };
                #add this socket into selection loop
                $sel->add($sock);
            }
            #Connection from PKTGEN
            elsif($fh == $ServerParams->{"PKTGEN"}->{"socket"})
            {
                $sock = $fh->accept();
                $PKTGENConnections->{"$sock"} = {
                    "tid" => "-1",
                    "buffer" => ""
                };
                $sel->add($sock);
            }
            elsif($fh == $ServerParams->{"ATTACKENGINE"}->{"socket"})
            {
                $sock = $fh->accept();
                $sel->add($sock);
                $ATTACKENGINEConnections->{"$sock"} = {};
            }
            elsif($fh == $ServerParams->{"CLUSTER_TEST"}->{"socket"})
            {
                # connection request from cluster master
                $sock = $fh->accept();
                $sel->add($sock);
                $CLUSTERConnections->{"$sock"} = {
                    status => "CONNECTED",
                    buffer => "",
                    'length' => 0,
                    DFA => "AUTH"
                };
            }
            elsif(&WhichConnection($fh, "GUI")) #for GUI requests
            {
                if(! &processGUIRequest_keepalive($fh, $GUIConnections))
                {
                    $sel->remove($fh);
                    close($fh);
                    delete $GUIConnections->{"$fh"};
                }
            }
            elsif(&WhichConnection($fh, "CLUSTER_TEST"))
            {
                if(! &processClusterMasterRequest($fh, $CLUSTERConnections))
                {
                    $sel->remove($fh);
                    close($fh);
                }
            }
            #stat. from pkt-gens
            elsif(&WhichConnection($fh, "PKTGEN")) #for PKTGEN running statistics
            {
                if(! &processPKTGENMsg_keepalive($fh, $PKTGENConnections))
                {
                    $sel->remove($fh);
                    close($fh);
                    delete $PKTGENConnections->{"$fh"};
                }
            }
            elsif(&WhichConnection($fh, "ATTACKENGINE"))
            {
                if(! AttackEngineServer::processAttackEngineResponse($fh, $ATTACKENGINEConnections->{"$fh"}))
                {
                    $sel->remove($fh);
                    close($fh);
                    delete $ATTACKENGINEConnections->{"$fh"};
                }
            }
            else
            {
                #TODO: error
                print("Isolated connection!!!!!!!Never should be here. Need debugging.");
                #throw this connection away
                $sel->remove($fh);
                close($fh);
            }
        }
        # can write
    }
}
业务逻辑代码靠 GuiServer.pm 承载,并返回内容,主要函数如下:
sub guiServerInit
{
    my $config = shift;

    $config_defs->{config} = $config;
    $config_defs->{path} = $config->{database}->{xmlDatabasePath};
    $config_defs->{maxHistory} = $config->{web}->{maxHistory};
    $config_defs->{webRoot} = $config->{web}->{webRoot};
    $config_defs->{cacheEnabled} = $config->{web}->{cacheEnabled};
    $config_defs->{sessionExpires} = $config->{web}->{sessionExpires};
    $config_defs->{port} = $config->{web}->{port};

    $config_defs->{protocolTemplates} = $config->{msgCompiler}->{protocolTemplates};

    $config_defs->{webVersion} = $config->{web}->{version} ? $config->{web}->{version} : "0.1";
    $config_defs->{msgCompilerVersion} = $config->{msgCompiler}->{version} ? $config->{msgCompiler}->{version} : "0.1";
    $config_defs->{pktgenVersion} = $config->{pktgenVersion}->{version} ? $config->{pktgenVersion}->{version} : "0.1";


    $config_defs->{protocolScripts} = $config->{msgCompiler}->{protocolScripts};
    $config_defs->{attackScripts} = $config->{msgCompiler}->{attackScripts};
    $config_defs->{database} = Database->getDatabaseConnection() or return undef;
    $config_defs->{totParser} = ToTParser->new($config_defs->{protocolTemplates}, $config_defs->{protocolScripts});
    #$config_defs->{"physicalPortManager"} = PhysicalPortManager->new("$config_defs->{path}/System/physicalPortManagement.config","$config_defs->{path}/System/ui_physicalPortMapping.config");
    $config_defs->{"physicalPortManager"} = PhysicalPortManager->new("$config_defs->{path}");
    #$config_defs->{"physicalPortManager"} = shared_clone(PhysicalPortManager->new("$config_defs->{path}"));

    #$config_defs->{"ManagementIPConfig"} = ManagementIPConfig->new($MANAGEMENTPORT);
    $config_defs->{"ManagementIPConfig"} = ManagementIPConfig->new($config_defs->{path});

    # set session time
    $config_defs->{sessions} = Session->new($config_defs->{sessionExpires});
    $config_defs->{preferences} = Preference->new($config_defs->{path});
    $config_defs->{packetGenerator}={};
    $config_defs->{packetGenerator}->{port} =  $config->{packetGenerator}->{port};

    $config_defs->{DocGenerator} =  $config->{DocGenerator};

    $config_defs->{PcapBuffer} =  $config->{PcapBuffer};

    # printf("INIT GUI LOG FILE: $config->{web}->{logFile}\n");
    if($config->{web}->{logFile} ne "")
    {
        open($config_defs->{GUILOGFILE}, ">$config->{web}->{logFile}") || die "failed to open gui log file!\n";
        guiLog("GUI LOG FILE\n");
    }
    #print(Dumper($config_defs));
    return IO::Socket::INET->new(LocalPort=> $config_defs->{port}, Reuse => 1, Listen => SOMAXCONN);
}

sub parseGUIRequest_keepalive
{
    my ($sock, $request, $cleanSockFun) = @_;
    my ($ret, $params, $file);

    while(length($request->{"buffer"}) > 0)
    {
        if(! defined($request->{"state"}))
        {$request->{"state"} = "WAIT_FOR_HEADER";}

        if($request->{"state"} eq "WAIT_FOR_HEADER")
        {
            # whether http header is ready
            $ret = index($request->{"buffer"}, "\r\n\r\n");
            if($ret <= 0) # negative
            {return "MORE_DATA";}

            # cut request header
            $request->{"header"} = substr($request->{"buffer"}, 0, $ret + 4);

            guiLog(Dumper($request->{"header"}));

            substr($request->{"buffer"}, 0, $ret + 4) = "";

            if($request->{"header"} =~ m/^.*Accept-Language: ([^\r\n]+)\r\n/s)
            {
                #Accept-Language: zh-CN,zh;q=0.8
                @{$request->{languages}} = split(/ *, */, $1);
            }

            # parse header
            $request->{"header"} =~ m/^.*(GET|get|POST|post)\s+(\S+).*/s;
            $request->{"method"} = uc($1);
            $request->{"uri"} = $2;
            $request->{"header"} =~ m/^.*Connection: (\S+)\r\n.*/s;
            $request->{"connection"} = $1;

            # parse cookie
            if($request->{"header"} =~ m/^.*Cookie: ([^\r\n]+)\r\n/s)
            {$request->{"cookies"} = $1;}

            # check Modifed-Since
            if($request->{"header"} =~ m/^.*If-None-Match/s)
            {
                print("TODO: return 304 not modifed\n");
                print(Dumper($request->{header}));
            }

            $request->{"uri"} =~ /^([^?]+)(\?(.+))?/;
            $request->{"path"} = $1;
            if($3){
                %{$params} = split(/&|=/, $3);
            }
            foreach my $pp (keys(%{$params}))
            {$request->{"params"}->{$pp} = &urlDecode($params->{$pp});}

            $request->{"state"} = "HEADER_READY";
        }

        if($request->{"state"} eq "HEADER_READY")
        {
            if($request->{"method"} eq "GET")
            {$request->{"state"} = "REQUEST_READY";}
            else
            {
                if($request->{"header"} =~ m/^.*Content-Length:\s+(\d+).*/s)
                {$request->{"length"} = $1;}
                if($request->{"length"} < 0) # wrong http post request, ignore it.
                {return "END";}
                else
                {
                    if($request->{"path"} =~ /^\/upload\//i || $request->{"path"} =~ /^\/import\//i)
                    {$request->{"state"} = "FILE_UPLOADING";}
                    elsif(length($request->{"buffer"}) >= $request->{"length"})
                    {
                        $request->{"data"} = substr($request->{"buffer"}, 0, $request->{"length"});
                        substr($request->{"buffer"}, 0, $request->{"length"}) = "";
                        $param = {};
                        %{$params} = split(/&|=/, $request->{"data"});
                        foreach my $pp (keys(%{$params}))
                        {
                            my $tmpParam=&urlDecode($params->{$pp});
                            $tmpParam =~ s/^\s+|\s+$//g;#remove head and tail backspeace,equal to string trim
                            $request->{"params"}->{$pp} = $tmpParam;
                        }
                        $request->{"state"} = "REQUEST_READY";
                    }
                    else
                    {return "MORE_DATA";}
                }
            }
        }
        # http request is ready
        if($request->{"state"} eq "REQUEST_READY")
        {
            #print("\n++++++++++\n".$request->{"path"}."\n+++++++++++\n");

            # forward to ajax,

            if($request->{"path"} =~ /^\/ajax\//)
            {$ret = &ajaxRequest($sock, $request);}
            elsif($request->{"path"} =~ /^\/attackQuery\//)
            {$ret = &attackQuery($sock, $request);}
            elsif($request->{"path"} =~ /^\/testsQuery\//)
            {$ret = &testsQueryProc($sock, $request);}
            elsif($request->{"path"} =~ /^\/login\//)
            {$ret = &loginProc($sock, $request);}
            elsif($request->{"path"} =~ /^\/logout\//)
            {$ret = &logoutProc($sock, $request);}
            elsif($request->{"path"} =~ /^\/session.js$/)
            {$ret = &sessionJSProc($sock, $request);}
            elsif($request->{"path"} =~ /^\/command\//)
            {$ret = &commandProc($sock, $request);}
            elsif($request->{"path"} =~ /^\/export\//)
            {$ret = &exportProc($sock, $request);}
            elsif($request->{"path"} =~ /^\/testReportsDoc\//)
            {$ret = &testReportsDocProc($sock, $request, $cleanSockFun);}
            elsif($request->{"path"} =~ /^\/monitor\//)
            {$ret = &monitorProc($sock, $request);}
            elsif($request->{"path"} =~ /^\/util\//)
            {$ret = &utilProc($sock, $request);}
            elsif($request->{"path"} =~ /^\/exportPcap\//)
            {$ret = &exportPcapProc($sock, $request, $cleanSockFun);}
            elsif($request->{"path"} =~ /^\/onlineHelp\//)
            {$ret = &onlineHelpProc($sock, $request);}
            elsif($request->{"path"} =~ /^\/loadresourcefile\//)
            {$ret = &loadResourceFileProc($sock, $request);}
            elsif($request->{"path"} =~ /^\/license\//)
            {$ret = &licenseProc($sock, $request);}
            else
            {$ret = &staticFileProc($sock, $request);}

            if(! defined($ret))
            {printf("connection closed!\n"); return undef;}

            foreach my $e (keys(%{$request}))
            {
                if($e eq "state" || $e eq "buffer")
                {next;}
                delete $request->{$e};
            }
            # waiting for next round
            $request->{"state"} = "WAIT_FOR_HEADER";

        }

        if($request->{"state"} eq "FILE_UPLOADING")
        {
            if(&fileUploadProc($sock, $request))
            {
                foreach my $e (keys(%{$request}))
                {
                    if($e eq "state" || $e eq "buffer")
                    {next;}
                    delete $request->{$e};
                }
                $request->{"state"} = "WAIT_FOR_HEADER";
            }
        }
        if(defined($request->{"connection"})){
            if($request->{"connection"} =~ /close/i)
                {printf("Connection to be closed!\n"); return "END";}
        }

    }
    return "MORE_DATA";
}
extjs 在前端通过ajax发起请求,与后端进行交互,示例代码如下:
// 左侧导航历史结果列表数据
var historyresultStore = new Ext.data.JsonStore({
            // store configs
            autoDestroy : true,
            storeId : 'historyresultStore',
            proxy : {
                type : 'ajax',
                url : '/loadresultlist/',
                reader : {
                    type : 'json',
                    root : 'history',
                    idProperty : 'id'
                }
            },
            fields : ['name', 'time', 'url']
        });
// 左侧导航历史结果列表数据的容器
var historychart = Ext.create('Ext.grid.Panel', {
    title : '历史结果',
    id : 'historychart',
    store : Ext.data.StoreManager.lookup('historyresultStore'),
    columns : [{
                header:'',
                xtype:'rownumberer',
                align:'center'
            },{
                text : '名称',
                dataIndex : 'name',
                align:'center'
            },{
                text : '时间',
                dataIndex : 'time',
                align:'center'
            }],
    width : "100%",
    forceFit : true,
    listeners : {
        'itemcontextmenu' : function(view, record, item, index, e, eOpts) {
            // 禁用浏览器的右键相应事件
            e.preventDefault();
            e.stopEvent();
            // var nodename = record.raw.name;
            delete_menu.showAt(e.getXY());
        }
    },
    viewConfig : {
        listeners : {
            scope : this,
            itemdblclick : function(view, record, item, index, e) {
                var filename = record.data.url;
                Ext.Ajax.request({
                    url : "/getrunlog/",
                    method : 'get',
                    params : {
                        name : filename
                    },
                    success : function(response, opts) {
                        // 清空tabs内容
                        Ext.getCmp('tabs').removeAll();
                        if(Ext.getCmp('Onlynavigationpanel')!=undefined){Ext.getCmp('Onlynavigationpanel').destroy();}
                        var testreport = Ext.create('Mytestreport');
                        Ext.getCmp('tabs').add(testreport);
                        Ext.getCmp('tabs').doLayout(true);
                        Ext.getCmp('testreport').body
                                .update('<iframe scrolling="auto" frameborder="0" width="100%" height="100%" src="../../testResult/'
                                        + filename
                                        + '/index.html"></iframe>');
                        // runlog.collapse();
                        testreport.expand();
                        // Ext.getCmp('runlog').body.update(response["responseText"]);
                    },
                    failure : function(response, opts) {
                        Ext.MessageBox.alert({
                                    title : '提示信息',
                                    msg : "运行日志获取失败!",
                                    buttons : Ext.Msg.OK
                                });
                    }
                });

            }
        }
    }

});
// console.log(historyresultStore);
historyresultStore.load();
性能测试从广义上讲分为压力测试、负载测试、强度测试、并发(用户)测试、大数据量测试、配置测试、可靠性测试等。压力测试是通过对被测系统不断加压,来发现该系统在什么条件下变得不可承受,从而获得系统能提供的最大服务级别的测试。查出程序对异常情况的抵抗能力,找出性能瓶颈。从本质上说,测试者是想破坏程序。目前一般压力测试都借助自动测试工具。
性能测试中常见的术语主要有吞吐量、吞吐率、请求响应时间、事务响应时间、 并发、并发用户数量、点击率、资源利用率等
调研了主流的压力测试工具:微软的loadrunner和apache的jmeter。最终选用了jmeter,一是因为jemeter是apache下的开源项目,方便改写和二次开发,二是jmeter对于Web压力测试这块功能和组件非常完善,基本可以满足已有的各种需求。
jmeter可用来测试静态资源请求和Web动态应用程序的性能。通过向预部署系统施加不同强度的工作负载来评估系统性能和用户体验。支持多种应用/服务类型压力、性能测试:
jmeter 可以通过GUI界面编写相应的脚本,进行测试。在高并发性能测试下,一般通过命令行参数来指定相应的配置文件,启动测试。jemeter支持测试报告模板编辑与导出功能,可生成html格式的测试报告文件。
jmeter依靠用户编写的测试例脚本来执行相应的测试,配置文件实际上是xml格式,但以.jmx结尾。测试例脚本由各个组件组成,每个组件都可以配置相应的参数。
测试组边包括线程组,控制器,监听器,定时器,断言,配置元件,属性和变量几个大类,每个大类下又包括多个组件。
]]>
用1表示物品具有某个特征,0表示不具有某个特征
Item-Profile 矩阵Item-User 评分矩阵Item-User * Item-Profile = User Profile (用户对不同标签感兴趣的程度)Item-Profile 与 User Profile 求余弦相似度连续特征 除了归一化(去中心,方差归一),不用做太多特殊处理,可以直接把连续特征扔到模型里使用。
无序特征 可以使用One-hot(也叫One-of-k)的方法把每个无序特征转化为一个数值向量。比如一个无序特征color有三种取值:red,green,blue。那么可以用一个长度为3的向量来表示它,向量中的各个值分别对应于red,green,blue。如:
color取值        向量表示
red            (1, 0, 0)
green        (0, 1, 0)
blue        (0, 0, 1)
有序特征 有些特征虽然也像无序特征那样只取限定的几个值,但是这些值之间有顺序的含义。例如一个人的状态status有三种取值:bad, normal, good,显然bad < normal < good
status取值    向量表示
bad            (1, 0, 0)
normal        (1, 1, 0)
good        (1, 1, 1)
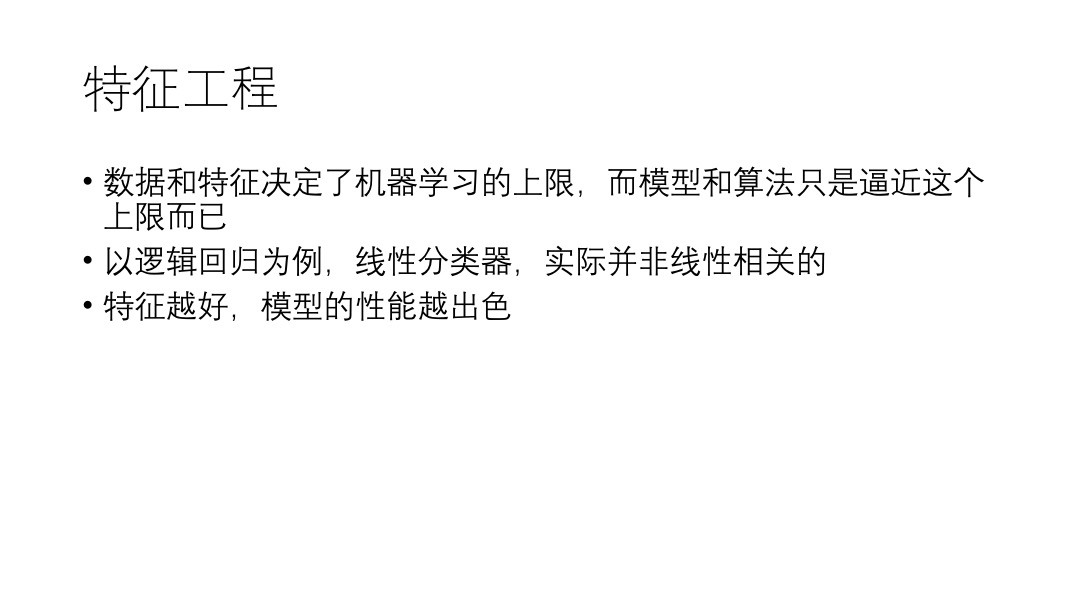
以线性分类器Linear Regression (LinearReg)为例,它是通过特征的线性加权来预测因变量。但大部分实际情况下,实际环境下都不会是这么简单的线性关系,甚至连单调关系都不会有。那么直接把特征扔进LinearReg模型是怎么也得不到好结果的。很多人会想着既然线性分类器搞不定,那就直接找个非线性的好了,比如高斯核的SVM。我们确实可以通过这种简单换算法的方式解决这个简单的问题。但非线性模型的时间复杂度较高,对于大规模实时应用,预测时间是不可忍受的。
http://breezedeus.github.io/2014/11/15/breezedeus-feature-processing.html
]]>这些优点都让logisticregression在做ctr预估的时候特别有优势,尤其是可扩展性,可以简单地增加特征,不需要太多的工作。
1.CPM,按展现付费,品牌广告
2.CPC,按点击付费,效果广告
3.CPA,按转化付费,效果广告
4.CPS,按销售分成,效果广告
算分排序这个东西能综合考虑老板和用户的需求,具体操作方式是,一个用户来了,对于想向这个用户投的广告,都打一个分,根据这个分进行倒排序,排在最前面的广告就是对这两方最合适的广告。
Score=bid*ctr
- bid表示广告的出价
- ctr的含义比较丰富
  既表示了用户对广告的喜欢程度
  也表示了广告的质量
  还表示了这个广告的期望的点击率
  还希望这个ctr跟广告真实的点击率也是一致的
算分排序平衡了老板与用户的需求,也就平衡了收益和用户体验。
FTRL 是综合了OGD的精度和RDA的稀疏性,适合在线增量学习,在处理诸如逻辑回归之类的带非光滑正则化项(例如1范数,做模型复杂度控制和稀疏化)的凸优化问题上性能非常出色。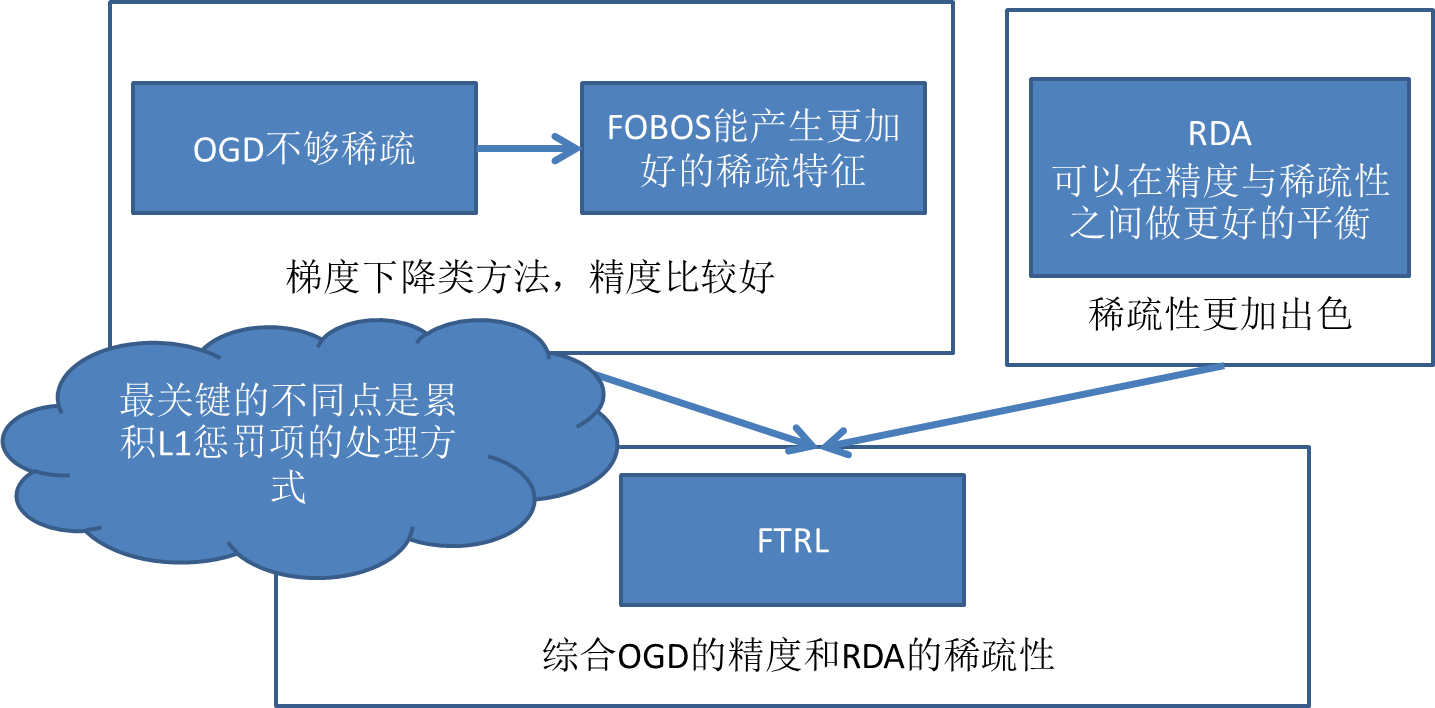
纵轴:True Positive Rate(真阳率)TPR=TP/(TP+FN)
为什么用AUC
因为ROC曲线有个很好的特性:当测试集中的正负样本的分布变化的时候,ROC曲线能够保持不变。在实际的数据集中经常会出现类不平衡(class imbalance)现象,即负样本比正样本多很多(或者相反),而且测试数据中的正负样本的分布也可能随着时间变化。AUC对样本的比例变化有一定的容忍性。AUC的值通常在0.6-0.85之间。
Spark 组件紧密集成的优点
- Spark底层优化了,基于Spark底层的组件,也得到相应的优化
- 节省了各组件部署,测试时间
- 向Spark增加新组件时,其他组件可立即共享新组件功能
log4j.rootCategory = WARN, consolehttp://idea.lanyus.com)插件安装:Plugins,搜索Scala直接安装,插件中有scala和sbt
//配置免密登录
touch authorized_keys
cat id_rsa.pub > authorized_keys
chmod 600 authorized_keys
Spark与Scala版本匹配
- Spark1.6.2 - Scala2.10
- Spark2.0.0 - Scala2.11
//java home 目录, jdk与scala版本
 /Library/Java/JavaVirtualMachines/jdk1.8.0_171.jdk/Contents/Home/bin

//配置sbt
libraryDependencies += "org.apache.spark" % "spark-core_2.11" % "2.0.2"

//写代码

//配置jar包
进入 File > Project Structure > Artifacts > + > JARs > From Module... > 第二个选项

//build
启动 master
./sbin/start_master.sh
:quit

启动 worker
./bin/spark-class

hdfs dfs -rm -R /user/algo/liujiaqi/wordcount-output-spark/

提交作业
//单机
spark-submit --master yarn-client --class WordCount myspark.jar

//集群
spark-submit --master yarn-cluster --conf spark.storage.memoryFraction=0.7 --conf spark.shuffle.memoryFraction=0.3 --conf spark.broadcast.blockSize=4096 --conf spark.broadcast.factory=org.apache.spark.broadcast.TorrentBroadcastFactory --conf spark.broadcast.compress=true --conf spark.serializer=org.apache.spark.serializer.JavaSerializer --conf spark.akka.threads=8 --conf spark.default.parallelism=63 --conf spark.port.maxRetries=100 --class WordCount  myspark.jar

//查看结果
hdfs dfs -cat /user/algo/liujiaqi/wordcount-output-spark/part-00000

//查看日志
yarn logs -applicationId xxxx
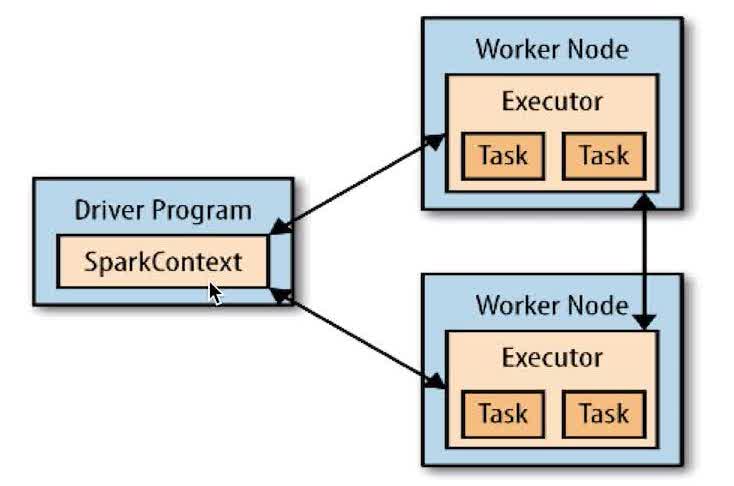
Driver programs: 包含程序main方法,RDDs的定义和操作。管理很多节点,称为executors。
image
SparkContex: Driver programs通过SparkContex对象访问Spark,SparkContex代表和一个集群的连接,在Shell中SparkContex自动创建好了,就是sc
把一个存在的集合传给SparkContex的parallelize()方法
val rdd = sc.parallelize(Array(1,2,3,4),4)
//第一个参数待处理的集合,第二个参数为分区个数
加载外部数据集
val addText = sc.textFile("helloSpark.txt");
匿名函数与类型推断
lines.filter(line.contains("world"));
//定义一个匿名函数,接受一个参数line
map(): 把函数应用到RDD的每一个元素,返回新RDDfilter(): 返回只包含满足filter()函数的元素的新RDDflatMap(): 对每个输入元素,输出多个输出元素,flat是压扁的意思,将RDD元素压扁后返回新RDDreduce(): 接收一个函数,作用在RDD两个类型相同的元素上,返回新元素,实现累加计数等collect(): 遍历整个RDD,向Driver programs返回RDD内容,需要单机内存能够容纳下,大数据时用saveAsTextFiletake(n): 返回RDD的n个元素(同时尝试访问最少partition),返回结果无需,测试使用top(n): 排序(根据RDD中数据比较器),前n个foreach(): 遍历每个元素,但不返回本地,可以配合println(),友好的打印出数据reduceByKeygroupByKeycombineByKey(): 最常用的key的聚合函数,返回类型可以与输入类型不一样RDD.persist(), unpersist()从缓存中移除RDD
- RDD一般和spark mlib同时使用
- RDD不支持sparksql操作
DataFrame
- 与RDD和Dataset不同,DataFrame每一行的类型固定为Row,只有通过解析才能获取各个字段的值
testDF.foreach{ line => val col1=line.getAs[String]("col1") val col2=line.getAs[String]("col2") }- DataFrame与Dataset一般与spark ml同时使用
- DataFrame与Dataset均支持sparksql的操作,比如select,groupby之类,还能注册临时表/视窗,进行sql语句操作,如
dataDF.createOrReplaceTempView("tmp") spark.sql("select ROW,DATE from tmp where DATE is not null order by DATE").show(100,false)- DataFrame与Dataset支持一些特别方便的保存方式,比如保存成csv,可以带上表头,这样每一列的字段名一目了然
DataSet
var lines = sc.textFile("liu")
lines.foreach(println)
lines.count()
var lines2 = lines.foreach(println)
var lines3 = lines.map(word=>(word,1))
var lines4 = lines.fileter(word=>word.contains("hello"))
print(lines.first())
var lines2 = lines.map(line=>(line.split("\t")(34),line))
newAPIHadoopRDD(path,format,key,value)
- HIVE 降低了Hadoop使用门槛,可以将SQL语句转化为Hadoop任务
- HBase 是一个存储结构化数据的分布式数据库,放弃了事务特性,追求更高的特战,HBase提供数据的随机读写和实时访问,实现了对表数据的读写功能
- Zookeeper 监控Hadoop集群的一个状态,管理集群配置,维护节点间数据的一致性
配置Hadoop
conf/start-all.sh
jps 查看本地启动进程
很多命令和Linux是一致的
./hdfs dfs -help #查看帮助文档
hdfs dfs -ls / #查看根目录
hdfs dfs -du -h #查看文件大小
hdfs dfs -text #查看文件
hdfs dfs -mkdir /test #创建test目录
hdfs dfs -copyFromLocal /home/hadoop/mk.txt /test/
hdfs dfs -cat /test/mk.txt
hdfs dfs -copyToLocal /test/mk.txt /home/hadoop/mk2.txt
hdfs dfs -chmod 777 /test/mk.txt
//使用lzop命令解压并查看
lzop -cd xxx.lzo |more

//压缩命令:
lzop xxx.log (生成xxx.log.lzo)

//列出test.lzo中各个文件的压缩信息
lzop -l test.lzo
通过相应的API,调用相应的方法即可
Hadoop 2.0 之后的资源管理器,移除了原有的JobTracker和TaskTracker,所有的MapReduce需要通过YARN进行调度。
Hadoop 1.x 默认block大小64M
Hadoop 2.x 默认block大小128M
可以在hdfs-site.xml中设置参数:dfs.block.size
map任务个数是受多条件制约的,一般一个DataNode的map任务数量控制在10到100比较合适
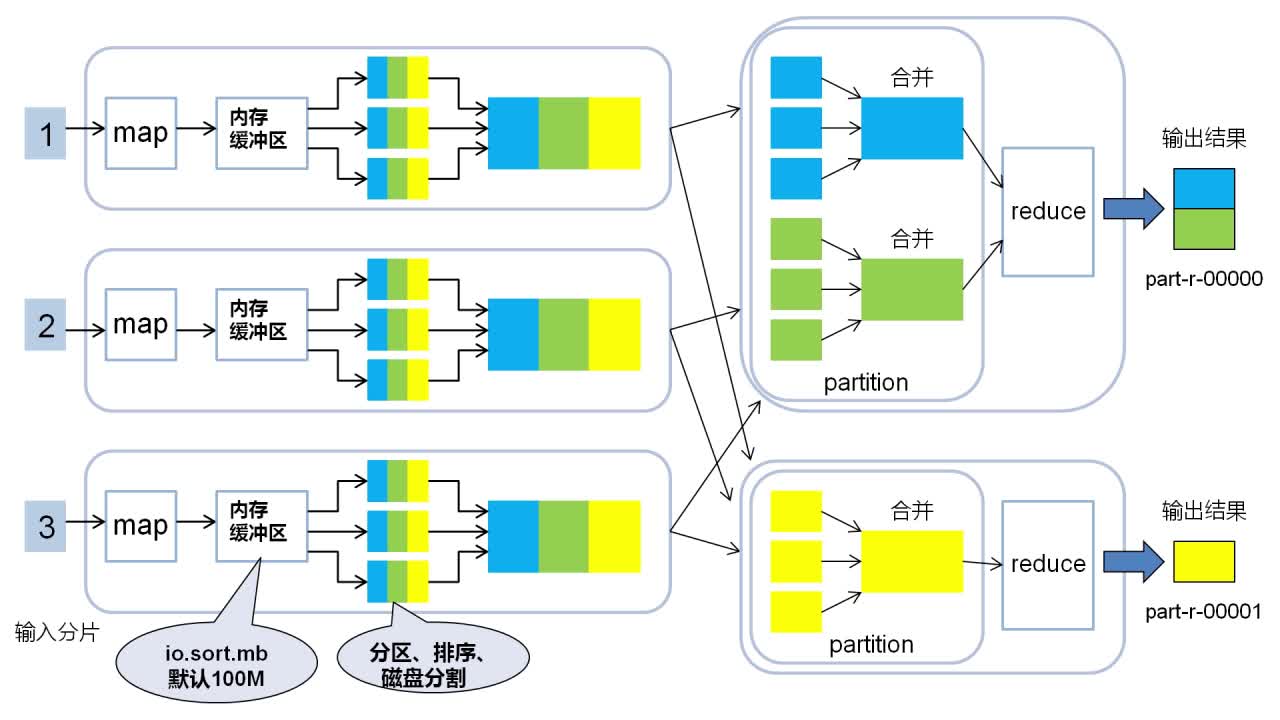
数据经过Map端输出后会进行网络混洗,经Shuffle后进入Reduce,在大数据量的情况下可能会造成巨大的网络开销。故可以在本地先按照key进行一轮排序与合并,在进行网络混洗,这个过程就是Combine.
图
partition任务,reduce任务,输出文件三者的数量总是相等的。所有数据默认会按照key值升序排序。
reduce任务不像Map任务那样受多个因素制约,大数据情况下,reduce数量不宜过少
Hadoop Archives 出现就是为了缓解大量小文件消耗NameNode内存的问题,HAR文件是通过在HDFS上构建一个分层文件系统来工作;使用SequenceFile,用文件名(filename)作为key,并且文件内容(file contents)作为value;可以通过Hbase开发一个对象存储服务;可以采用压缩、合并小文件的策略,例如设置文件输入类型为CombineFileInputFormat格式
show databases;
use database;
show tables;
desc table;
dfs -ls 目录;
! 操作系统命令
select * from gen_yp_show_log_det_hour limit 5;
source mysql.sql;
hive -S #进入静默模式
既可以直接编写相应JAVA处理程序,也可用Python等其他语言编写Map,Reduce处理过程,利用Hadoop进行执行
编译 WordCount.java
javac -classpath -d
打包
jar -cvf wordcount.jar *.class
hadoop jar
yarn logs -applicationId xxxx    //查看日志
加载到内存发生在Job执行之前,每个从节点各自都缓存一份相同的共享数据。如果数据量过大,可以将其分批缓存,重复执行作业。
在main方法中加载共享文件的HDFS路径,路径可以是目录也可以是文件。可以在路径末尾追加“#”+别名,在map阶段可以使用该别名
String cache = "hdfs://10.105.***.***:8020/cache/file";    //目录或文件
cache = cache + "#myfile";     //myfile是文件别名
job.addCacheFile(new Path(cache).toUri(),conf)    //添加到job设置
在Mapper类或Reducer的setup方法中,用输入流获取分布式缓存中的文件
//该方法只执行一次,在map方法循环之前
protected void setup(Context context) throws IOException,InterruptedException{
    FileReader reader = new FileReader("myfile");
    BufferedReader br = new BufferedReader(reader);
     1
2
3
4
5
6
        }

### Mac Eclipse Hadoop-plus配置
将插件jar包放在Eclipse的 **dropins** 文件夹下
- 查看端口
> hdfs端口号在:```$HADOOP_HOME/conf/core-site.xml中
mr端口号在:
$HADOOP_HOME/conf/mapred-site.xml中
dfs.datanode.ipc.address  JobTracker端口,默认50020
fs.defaultFS    HDFS端口,默认8020
 cat 0318part-00001|python mapper.py
cat 0318part-00001|python mapper.py |sort -k1,1|python reducer.py
//查看日志
yarn logs -applicationId appid
//查看状态
yarn application -status
//杀掉任务
yarn application -kill appid
分治问题复杂度计算
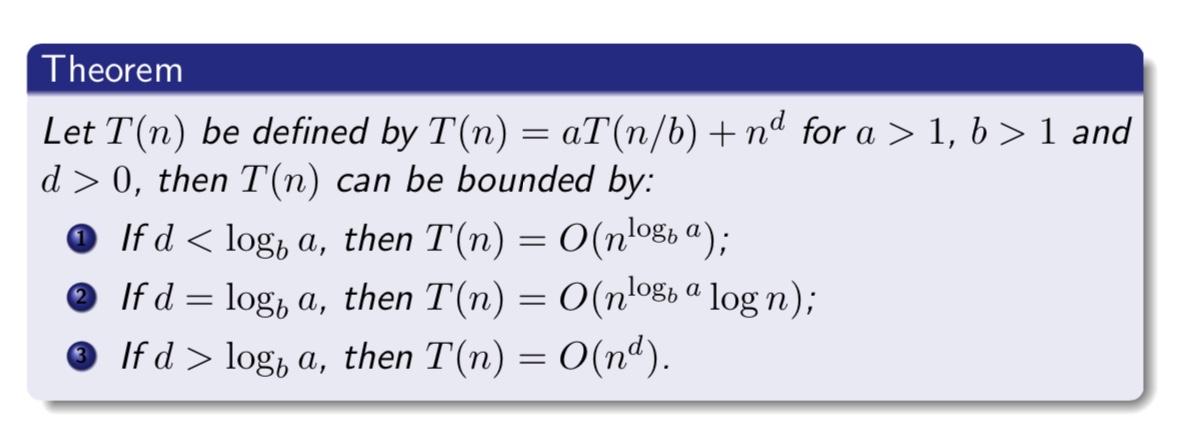
n表示节点数,m表示边数
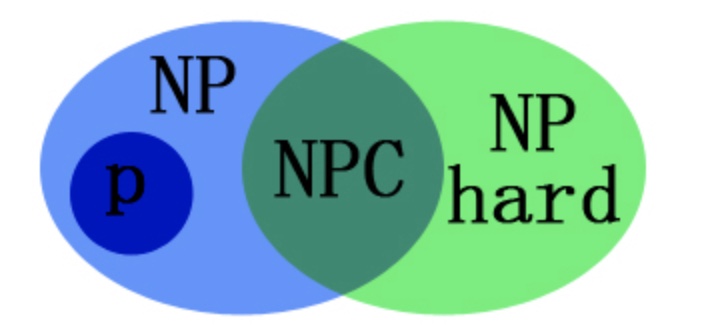
证明一个问题是 NPC问题。先证明它至少是一个NP问题,再证明其中一个已知的NPC问题能约化到它,这样就可以说它是NPC问题了
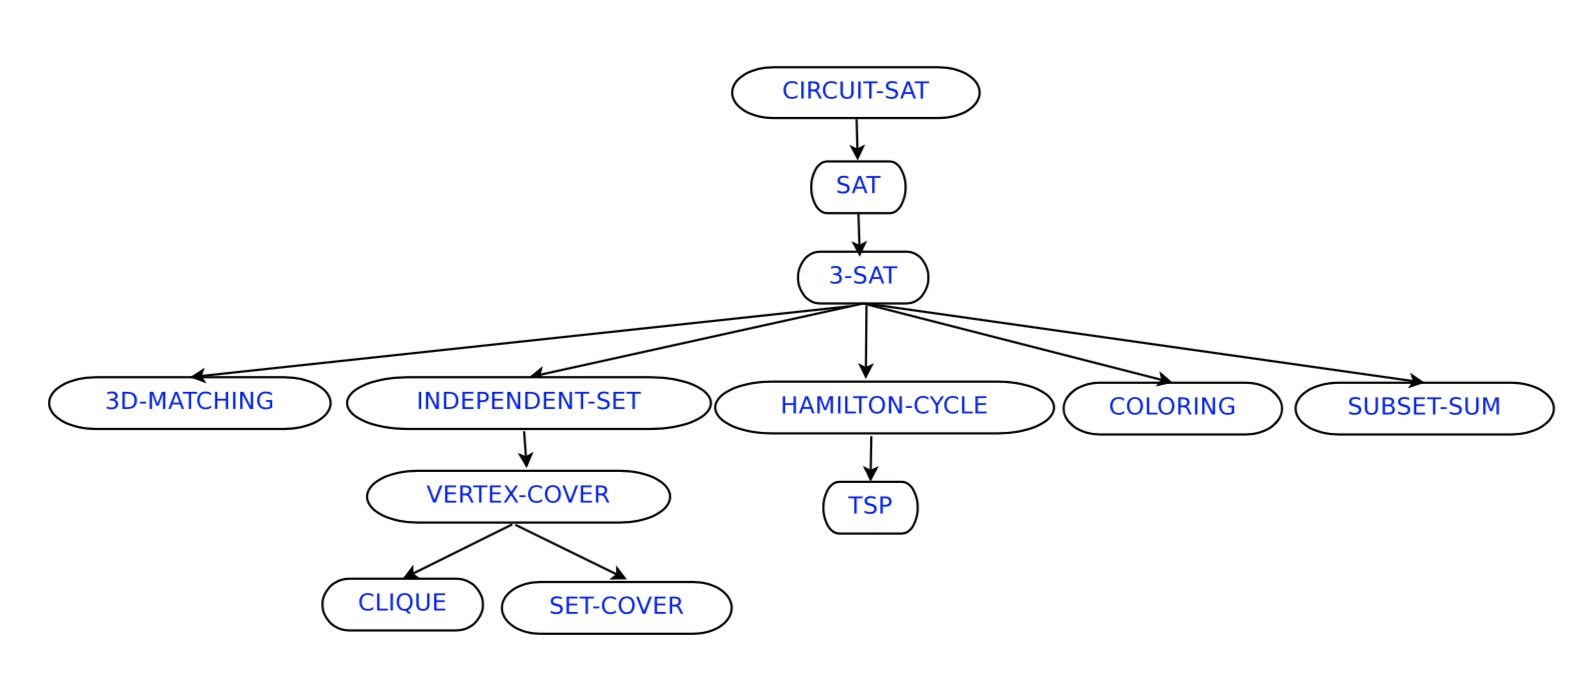
Suppose you have n friends, and some pairs of them don’t get along. How to invite at least k of them to dinner if you don’t want any interpersonal tension?
Input: Given a graph G =< V, E >, and an integer k,
Output: is there a set of nodes S⊆V, |S|=k , such that no two nodes in S are joined by an edge?
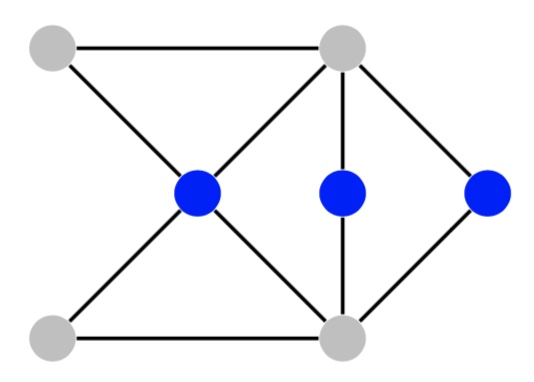
The three nodes in blue are independent.
Given n sites connected with paths, how many guards (or
cameras) should be deployed on sites to surveille all the paths?
Input: Given a graph G =< V, E >, and an integer k,
Output: is there a set of nodes S ⊆ V, |S| = k, such that eachedge has at least one of its endpoints in S?
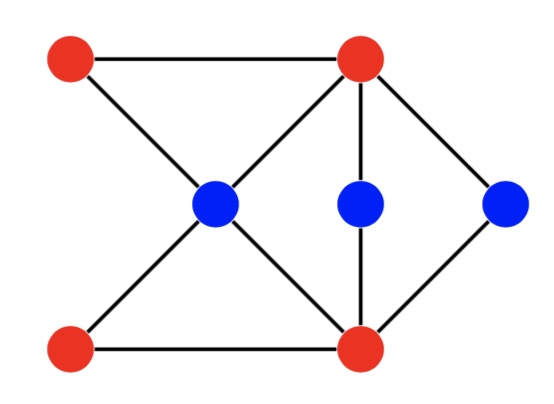
the complement of an independent set (in blue) forms a vertex cover (in red)
expressing constraints on a set of variables (in AI), verifying whether a circuit has the desired functionality (in VLSI), etc.
Input: Given a CNF φ = C1 ∧C2…∧Ck;
Output: Is there an assignment of all xi such that all clauses Cj.are satisfied?
Example:
CNF: (x1 ∨¬x2)∧(¬x1 ∨¬x3)∧(x2 ∨¬x3)
TRUE assignment: x1 = FALSE, x2 = FALSE, x3 = FALSE;
每个 Ci 含有三个变量
Input: Given a graph G =< V, E >
Output: Is there a cycle visiting every node exactly once?
Output: Is there a k−coloring of G such that each node has a color, but the two endpoints of an edge have different colors?
Input: Given n numbers S = w1, w2, …, wn, and an objective value W;
Output: is there a subset S′ ⊆ S such that the sum of S′ is W?
Input: Graph G =< V, E >, an integer k;
Output: is there a clique of size k? Here, a clique refers to a subset of vertices that are all connected.


(1-7个选课学生组成1队),完成以下任务(12月份末考查):
新闻及评论搜索:定向采集不少于4个中文社会新闻网站或频道,实现这些网站新闻信息及评论信息的自动爬取、抽取、索引和检索。
http://47.95.248.80:8089/Search/index
Python , Scrapy Lucene,JAVA Servlet Bootstrap ,JQueryTomact
.
├──Classfier(模型训练)
│  ├── DataProcess(数据预处理)
│  │   ├── jieba(结巴分词库)
│  │   ├── DataPreprocess.py(数据预处理)
│  │   └── message.txt(训练数据)
│  │
│  └── Classifiers.py(分类器)
│
├── Sites (演示Demo)
│   ├── Model
│   │   ├── jieba(结巴分词库)
│   │   ├── all_raw(结巴分词库)
│   │   │   ├── model(训练出的模型)
│   │   │   └── vec_tfidf(训练阶段生成的词向量)
│   │   │
│   │   └── demoAPI.py(demo调用Python接口)
│   │
│   ├── index.php(主页)
│   └── result.php(结果显示页面)
│
└── README.md
$ cd Classfier/DataProcess
$ python DataPreprocess.py
DataPreprocess.py 中主要参数变量含义如下:
- n_components: 降维到n_components维
- data_lines: 预处理的短信条数
- data_type: 预处理类型
{raw, pca, nmf, pca&nmf}
$ cd ..
$ python Classifiers.py
注意修改代码中相关路径,Classifiers.py 中主要参数变量含义如下:
- takeup: 测试数据占总数据的比例
vec_tfidf 文件 放置 Sites/Model/all_raw 目录下Sites/Model/all_raw/model 目录下Sites 目录下文件放置 apache 相应网站目录下Pcap文件解析的方法网上有很多相关文章,Pcap文件的格式以及使用Wireshark查看Pcap文件的方法也都有详细教程。然而利用Perl脚本语言对Pcap文件进行解析的相关代码和文章并没有。本文介绍了如何使用Perl脚本语言对Pcap文件进行解析。
Net::Pcap 模块封装了用于解析Pcap文件的一些方法,首先介绍如何使用CPAN安装 Net::Pcap模块。
//CPAN相关命令
//获得帮助
cpan>h

//列出CPAN上所有模块的列表
cpan>m

//安装模块
cpan>install Net::Pcap

//退出
cpan>q
pcap_loop($pcap, $count, \&callback, $user_data)
从pcap读取count个包,并且调用使用参数user_data调取callback函数。如果count为负,则循环读取直到错误发生。
my $pcap = pcap_open_offline($fileDir, \$err) || die "failed to open pcap file $pcap!";
while(1)
{
    $ret = pcap_loop($pcap, -1, \&load_pcap, $this);
    if($ret == -1)
    {
        print "error on processing packets in pcap file: $@!\n";
        die "error on processing packets in pcap file: $@!\n";
        last;
    }
    elsif($ret == 0 || $ret == -2)
    {
        print "end of pcap processing: $@!\n";
        last;
    }
}
网络数据包格式如下图所示: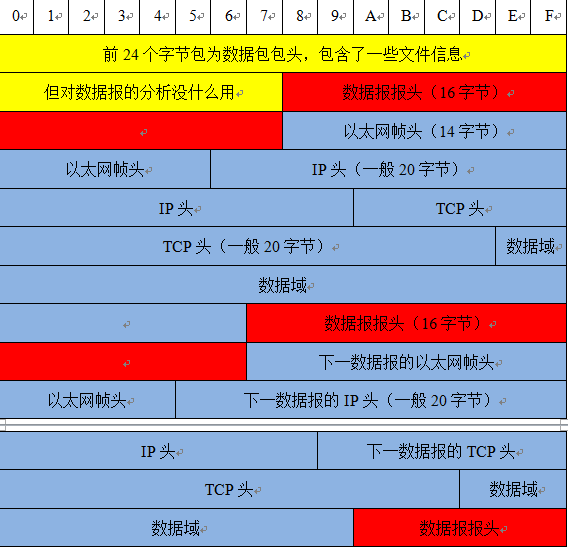
unpack (packformat, formatstr) 函数将以机器格式存贮的值转化成Perl中值。packformat代表解析格式,formatstr为要解析的对象。
通过判断各个位置上的值从而确定包的类型。通过记录连接的状态,确定TCP三次握手的建立与解除。具体代码如下:
foreach my $event (sort(keys(%{$packets})))
    {
        print "testlog: a new packet begin----------------------- \n";

        my $packet = $packets->{$event}->{pkt};
        my $proto = unpack("H*", substr($packet, 12, 2));
        if($proto eq "0800") #ipv4
        {
            $count ++;
            my $off = 14;
            my $iphl = (unpack("C", substr($packet, $off, 1)) & 0x0f); # header length  , <<2 is the actual length
            my $ip_payload_len = unpack("n", substr($packet, $off + 2, 2)); #total length
            #print "testlog: packet total length: ". $ip_payload_len ."\n";
            $proto = unpack("C", substr($packet, $off + 9, 1)); #net proto

            my $sip = inet_ntoa(substr($packet, $off + 12, 4)); #source ip addr
            my $dip = inet_ntoa(substr($packet, $off + 16, 4)); #dest ip addr

            # chop the padding bytes off
            $packet = substr($packet, 0, $off + $ip_payload_len); #a full packet

            if($iphl > 5)
            {print "Warning: ip packet with ip option\n";}

            my $ipPayloadLen = unpack("n", substr($packet, $off + 2, 2)) - ($iphl << 2); #total length - header length

            # skip ipv4 header
            $off += ($iphl << 2);
            if($proto == 6)        # tcp session
            {
                my $tcp_hdrl = unpack("C", substr($packet, $off + 12, 1)) >> 2; # tcp header length , <<2 is the actual length
                my $tcp_flag = unpack("C", substr($packet, $off + 13, 1)); #tcp flag
                #print $tcp_flag . "\n";
                my $sport = unpack("n", substr($packet, $off, 2));    #source port
                my $dport = unpack("n", substr($packet, $off + 2, 2));    #dest port

                if($ipPayloadLen - $tcp_hdrl < 0) # eq 0
                {
                    print "invalid tcp packet: $proto packet not supported!\n";
                    last;
                }

                my $c = "$sip:$sport<->$dip:$dport";
                my $s = "$dip:$dport<->$sip:$sport";

                # recode session state
                if(!defined($session))
                {
                    print "testlog: session will be defined! \n";
                    $session = {
                        id => $c,
                        cstate => "closed",
                        sip => $sip,
                        dip => $dip,
                        sport => $sport,
                        dport => $dport
                    };
                }

                if($tcp_flag & 0x04)
                {
                    print "Warning: tcp session with RST, need mannual checking!Stop session analyzing: $frameID!\n";
                    $session->{cstate} = "closed";
                }
                print "testlog: session state: ". $session->{cstate} ."\n";
                if($session->{cstate} eq "closed")    # open session
                {
                    if(($tcp_flag & 0x02))        # syn open sesstion
                    {
                        $session->{cstate} = "syn_sent";
                    }
                    else
                    {
                        if(length(substr($packet, $off + $tcp_hdrl)) > 0)
                        {print "Warning: tcp session disordered on closed, need mannual checking!Stop session analyzing: $sip : $sport <-> $dip : $dport \n";}
                    }

                }
                elsif($session->{cstate} eq "syn_sent")
                {
                    #print ($tcp_flag);
                    #print "\n";
                    if(($tcp_flag & 0x12)==0x12){
                        print "ok";
                    };
                    print "\n";
                    if(($tcp_flag & 0x02) && ($sip eq $session->{sip}) && ($sport eq $session->{sport})) # syn from client retransmission
                    {print "tcp retransmission detected!\n";}
                    elsif(($tcp_flag & 0x12) && ($sip eq $session->{dip}) && ($sport eq $session->{dport}))    # syn_ack from server
                    {$session->{cstate} = "syn_rcvd";}
                    else
                    {
                        print "Warning: tcp session disordered on syn_sent, need mannual checking!Stop session analyzing!\n";
                    }

                }
                elsif($session->{cstate} eq "syn_rcvd")
                {
                    if(($tcp_flag & 0x10) && ($sip eq $session->{sip}) && ($sport eq $session->{sport}))  # ack from client
                    {
                        $session->{cstate} = "connected";         # won't check ack
                        print(FD "CONNECT twoarm 1 0 tcp $dip $dport $sip $sport\n\n");
                    }
                    else
                    {print "Warning: none ack packet on syn_rcvd!\n";}
                }
                elsif($session->{cstate} eq "connected")
                {
                    #print "testlog: $sip ---- $session->{sip} ----- $session->{dip}";
                    if($sip eq $session->{sip} && ($sport eq $session->{sport}))        # from client
                    {
                        if($tcp_flag & 0x01)
                        {
                            $session->{FIN} += 1;
                            $session->{FINFrom} = 1; # this is the second FIN, disconnect begin from server
                        }
                        else
                        {
                            if(length(substr($packet, $off + $tcp_hdrl)) > 0) #TCP payload is not empty
                            {
                                $str_temp = unpack('H*',substr($packet, $off + $tcp_hdrl));
                                my @str_temp2 = split(//, $str_temp);
                                my $str_temp3;
                                for($i=0; $i<@str_temp2; $i=$i+2){
                                    $str_temp3 = $str_temp3 . "\\x" . $str_temp2[$i] . $str_temp2[$i+1];
                                }
                                print "$str_temp3 \n";
                                print(FD "SEND 0 #\"$str_temp3\" NOW\n\n");
                            }
                        }
                    }
                    elsif($sip eq $session->{dip} && ($sport eq $session->{dport}))
                    {
                        if($tcp_flag & 0x01)
                        {
                            $session->{FIN} += 1;
                            $session->{FINFrom} = 0; # this is the second FIN, disconnect begin from client
                        }
                        else
                        {
                            if(length(substr($packet, $off + $tcp_hdrl)) > 0)
                            {
                                $str_temp = unpack('H*',substr($packet, $off + $tcp_hdrl));
                                my @str_temp2 = split(//, $str_temp);
                                my $str_temp3;
                                for($i=0; $i<@str_temp2; $i=$i+2){
                                    $str_temp3 = $str_temp3 . "\\x" . $str_temp2[$i] . $str_temp2[$i+1];
                                }
                                print "$str_temp3 \n";
                                print(FD "SEND 1 #\"$str_temp3\" NOW\n\n");
                            }
                        }
                    }
                    else
                    {
                        print "invalid packet on connected tcp session\n";
                    }
                }
                if($session->{cstate} eq "connected" && $session->{FIN} == 2)
                {
                    $FINFrom = $session->{FINFrom};
                    print(FD "DISCONNECT $FINFrom\n");
                    $session->{cstate} = "closed";
                    delete($session->{FIN});
                }
            }
        }
    }
https://metacpan.org/pod/Net::Pcap
http://blog.csdn.net/eroswang/arti
http://blog.sina.com.cn/s/blog_4936c31d010115hj.htmlcle/details/2032564
记得本科时上的《计算机图形学》上学过图像的变换矩阵,当时还不知道有什么用,现在派上用场了。
透视变换的通用公式是:
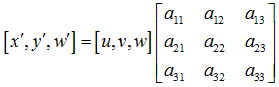
其中,u,v是原始坐标点,写成增广向量形式,w=1。对应的变换后坐标为 x=x'/w',y=y'/w' 。变换矩阵中, a11,a12,a21,a22 表示线性变换, a31,a32 表示平移, a13,a23 表示透视变换。
重写变换公式可得: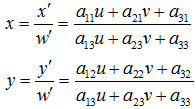
图像原始坐标点已知,如果我们能够指定原始图像中几个点对应变换后的坐标。则可通过上述公式计算得到变换矩阵中各分量的值。从而通过变换矩阵得到变换后的图像。
由于正方形的特殊性,选择正方形作为中间过度。通过将任意四边形先变换到正方形,再由正方形变换到四边形。通过这种方式便可将一个任意四边形变换到另一个任意四边形。
具体实现代码如下:
private PerspectiveTransform(float a11, float a21, float a31, float a12, float a22, float a32,float a13, float a23, float a33) {
   this.a11 = a11;
   this.a12 = a12;
   this.a13 = a13;
   this.a21 = a21;
   this.a22 = a22;
   this.a23 = a23;
   this.a31 = a31;
   this.a32 = a32;
   this.a33 = a33;
 }

 public static PerspectiveTransform quadrilateralToQuadrilateral(float x0, float y0, float x1, float y1, float x2, float y2, float x3, float y3, float x0p, float y0p, float x1p, float y1p, float x2p, float y2p, float x3p, float y3p) {

   PerspectiveTransform qToS = quadrilateralToSquare(x0, y0, x1, y1, x2, y2, x3, y3);
   PerspectiveTransform sToQ = squareToQuadrilateral(x0p, y0p, x1p, y1p, x2p, y2p, x3p, y3p);
   return sToQ.times(qToS);
 }

 public void transformPoints(float[] points) {
   int max = points.length;
   float a11 = this.a11;
   float a12 = this.a12;
   float a13 = this.a13;
   float a21 = this.a21;
   float a22 = this.a22;
   float a23 = this.a23;
   float a31 = this.a31;
   float a32 = this.a32;
   float a33 = this.a33;
   for (int i = 0; i < max; i += 2) {
     float x = points[i];
     float y = points[i + 1];
     float denominator = a13 * x + a23 * y + a33;
     points[i] = (a11 * x + a21 * y + a31) / denominator;
     points[i + 1] = (a12 * x + a22 * y + a32) / denominator;
   }
 }

 public void transformPoints(float[] xValues, float[] yValues) {
   int n = xValues.length;
   for (int i = 0; i < n; i ++) {
     float x = xValues[i];
     float y = yValues[i];
     float denominator = a13 * x + a23 * y + a33;
     xValues[i] = (a11 * x + a21 * y + a31) / denominator;
     yValues[i] = (a12 * x + a22 * y + a32) / denominator;
   }
 }

 public static PerspectiveTransform squareToQuadrilateral(float x0, float y0,
                                                          float x1, float y1,
                                                          float x2, float y2,
                                                          float x3, float y3) {
   float dx3 = x0 - x1 + x2 - x3;
   float dy3 = y0 - y1 + y2 - y3;
   if (dx3 == 0.0f && dy3 == 0.0f) {
     // Affine
     return new PerspectiveTransform(x1 - x0, x2 - x1, x0,
                                     y1 - y0, y2 - y1, y0,
                                     0.0f,    0.0f,    1.0f);
   } else {
     float dx1 = x1 - x2;
     float dx2 = x3 - x2;
     float dy1 = y1 - y2;
     float dy2 = y3 - y2;
     float denominator = dx1 * dy2 - dx2 * dy1;
     float a13 = (dx3 * dy2 - dx2 * dy3) / denominator;
     float a23 = (dx1 * dy3 - dx3 * dy1) / denominator;
     return new PerspectiveTransform(x1 - x0 + a13 * x1, x3 - x0 + a23 * x3, x0, y1 - y0 + a13 * y1, y3 - y0 + a23 * y3, y0, a13, a23, 1.0f);
   }
 }

 public static PerspectiveTransform quadrilateralToSquare(float x0, float y0, float x1, float y1, float x2, float y2, float x3, float y3) {
   // Here, the adjoint serves as the inverse:
   return squareToQuadrilateral(x0, y0, x1, y1, x2, y2, x3, y3).buildAdjoint();
 }

 PerspectiveTransform buildAdjoint() {
   // Adjoint is the transpose of the cofactor matrix:
   return new PerspectiveTransform(a22 * a33 - a23 * a32,
       a23 * a31 - a21 * a33,
       a21 * a32 - a22 * a31,
       a13 * a32 - a12 * a33,
       a11 * a33 - a13 * a31,
       a12 * a31 - a11 * a32,
       a12 * a23 - a13 * a22,
       a13 * a21 - a11 * a23,
       a11 * a22 - a12 * a21);
 }

 PerspectiveTransform times(PerspectiveTransform other) {
   return new PerspectiveTransform(a11 * other.a11 + a21 * other.a12 + a31 * other.a13,
       a11 * other.a21 + a21 * other.a22 + a31 * other.a23,
       a11 * other.a31 + a21 * other.a32 + a31 * other.a33,
       a12 * other.a11 + a22 * other.a12 + a32 * other.a13,
       a12 * other.a21 + a22 * other.a22 + a32 * other.a23,
       a12 * other.a31 + a22 * other.a32 + a32 * other.a33,
       a13 * other.a11 + a23 * other.a12 + a33 * other.a13,
       a13 * other.a21 + a23 * other.a22 + a33 * other.a23,
       a13 * other.a31 + a23 * other.a32 + a33 * other.a33);

 }
半年的计算所实习生活收获良多,受益匪浅,是一段令人难忘的时光。总结起来可以概括为三点:
从对科研工作的陌生与懵懂到了解与尝试,并试图提出自己的想法。在这个过程中,阅读文献的能力提高了,了解了期刊会议文章的组织结构。如何快速了解一篇文章的核心思想,找到自己的关注点。如何检索,下载自己所关注领域的文章。同时,自己的逻辑思维能力得到了锻炼,分析总结别人方法的优缺点,找到问题所在,并尝试提出自己的看法。这是一个不断尝试与修改的过程。每一个灵感的迸发与产生都是一次思维的升级。对科研工作也有了进一步的认识,科研所需的不仅仅是代码能力,学习能力的体现,而是一种综合能力的体现。写作能力,英语素质以及发现问题总结问题的能力都是科研中很重要的一部分。没有人会打开你的脑子看到你的想法,你要表达出来,写出来!
体会了一个实际项目从可行性分析到项目开发,性能优化,直到最后交付的过程。核心功能的开发时间反而比性能,可用性优化的时间要短。一个项目的完成,不仅仅是功能的实现,还要保证兼容性,性能,文档等多个方面的完成。在项目开发的过程中,自己读代码的能力也得到了明显的提升。阅读优秀的开源代码可以体会到别人的编程思想。读懂了别人的代码,才能在此基础上实现自己的需求。最后一点体会就是不要害怕困难,简单的问题,做着很开心,但收货往往很少。越是困难的问题,硬着头皮做下去,收获往往很大。
最大的收货莫过于朋友与友谊。还记得刚到所里的那几天,陌生的环境让我很不适应,大家仿佛都各行其是,似乎一下从学生阶段到了工作阶段,孤独感油然而生。渐渐的认识了许多同为大四提前入所的学生,和他们一起聚餐,一起出游,一起打游戏,让我渐渐找到了归属感。遇到他们,我真幸运!
特别要感谢我的导师张瀚文老师的关怀与指导,感谢课题组的每一位老师。
新学期,新气象。上周一连开了三个开学典礼,院里的,所里的和学校的,认识了许多新同学,熟悉了校园新环境。安逸的环境似乎让自己放松了警惕,也变得些许懒散。
时光易逝,要时刻督促自己不要浪费时光。希望在接下来的一年时间里能够
好好学习!
天天向上!
]]>Selenium 是一个用于Web应用程序测试的工具。Selenium 测试直接运行在浏览器中,就像真正的用户在操作一样。框架底层使用 JavaScript 模拟真实用户对浏览器进行操作。测试脚本执行时,浏览器自动按照脚本代码做出点击,输入,打开,验证等操作,就像真实用户所做的一样,从终端用户的角度测试应用程序。
sudo apt-get install python默认2.7.12
sudo apt-get update        #更新下apt-get库否则下载pip会出错
sudo apt-get install python-pip        #默认是8.1.1
sudo pip install selenium    #安装selenium
sudo apt-get install firefox
sudo apt-get install xvfb
sudo pip install pyvirtualdisplay
下载 geckodriver        https://github.com/mozilla/geckodriver/releases
sudo chmod a+w geckodriver
定位页面中的元素
find_element_by_id
find_element_by_name
find_element_by_xpath
find_element_by_link_text
find_element_by_partial_link_text
find_element_by_tag_name
find_element_by_class_name
find_element_by_css_selector
定位多个元素
find_elements_by_name
find_elements_by_xpath
find_elements_by_link_text
find_elements_by_partial_link_text
find_elements_by_tag_name
find_elements_by_class_name
find_elements_by_css_selector
操作元素方法
clear 清除元素的内容
send_keys 模拟按键输入
click 点击元素
submit 提交表单
利用Selenium爬取网络数据时,遇到的最多的问题就是页面或浏览器选项卡未加载出来时,对页面进行操作的问题。常见得报错包括IndexError: list index out of range等。
一种解决办法是,在一些操作后加 time.sleep(3) 来使进程等待一段固定时长,再进行后续操作。更好的办法应该是等到页面加载完成后,自动进行后续操作。
等待元素出现后再执行后续操作
wait模块的WebDriverWait类是显性等待类,先看下它有哪些参数与方法:
def __init__(self, driver, timeout, poll_frequency=POLL_FREQUENCY, ignored_exceptions=None):
      """Constructor, takes a WebDriver instance and timeout in seconds.

         :Args:
          - driver - Instance of WebDriver (Ie, Firefox, Chrome or Remote)
          - timeout - Number of seconds before timing out
          - poll_frequency - sleep interval between calls
            By default, it is 0.5 second.
          - ignored_exceptions - iterable structure of exception classes ignored during calls.
            By default, it contains NoSuchElementException only.

         Example:
          from selenium.webdriver.support.ui import WebDriverWait \n
          element = WebDriverWait(driver, 10).until(lambda x: x.find_element_by_id("someId")) \n
          is_disappeared = WebDriverWait(driver, 30, 1, (ElementNotVisibleException)).\ \n
                      until_not(lambda x: x.find_element_by_id("someId").is_displayed())
      """
调用方法如下:
WebDriverWait(driver, 超时时长, 调用频率, 忽略异常).until(可执行方法, 超时时返回的信息)
示例代码:
WebDriverWait(driver, 600).until(lambda x: x.find_elements_by_xpath("//div[@class=\"col-9 search-2017-2 pr10 pl0\"]/div"))
等待新的页面(选项卡)打开后执行后续操作
while len(driver.window_handles)<2:        #如果选项卡数量小于2
    first.click()
    time.sleep(1)
VBA 编写的宏命令可以取代手动对 Excel 的大量操作,也可以实现 Excel 未提供的函数。相比其他语言, VBA 天然的支持 Excel 大规模数据处理,对 Excel 格式数据处理更快,省去了格式字符匹配等问题。同时 VBA 可与 Excel 中自带的函数混合使用,提高了易用性。
Sub Electric()
    Dim target As Workbook
    Set target = Workbooks("a.xlsm")

    Dim source As Workbook
    Set source = Workbooks("b.xlsx")

    For i = 6 To target.Sheets("2014").Cells(Rows.Count, 1).End(xlUp).Row
        For j = 3 To target.Sheets("2014").Cells(Rows.Count, 1).End(xlUp).Row
            If target.Sheets("2014").Cells(i, 3) = source.Sheets("2014").Cells(j, 1) Then   '如果单元格内容相同
                target.Sheets("2014").Cells(i, 24) = source.Sheets("2014").Cells(j, 2)
                Exit For
            End If
        Next
    Next
End Sub
Sub Statistic()

    Dim target As Workbook
    Set target = Workbooks("data.xlsm")

    '使用“高级筛选”功能将不重复公司Id数据显示在sheet4中
    target.Sheets("sheet3").Columns(2).AdvancedFilter 2, , target.Sheets("sheet8").Cells(1, 1), 1
    s1 = target.Sheets("sheet8").Cells(Rows.Count, 1).End(xlUp).Row
    '下面代码用COUNTIF函数统计重复次数
    For i = 1 To s1
        target.Sheets("sheet8").Cells(i, 2) = WorksheetFunction.CountIf(target.Sheets("sheet3").Columns(2), target.Sheets("sheet8").Cells(i, 1))
    Next


End Sub
Sub SelectByYear()

    Dim target As Workbook
    Set target = Workbooks("data.xlsm")
    m = 1

    For i = 2 To target.Sheets("sheet8").Cells(Rows.Count, 1).End(xlUp).Row
        If target.Sheets("sheet8").Cells(i, 2) > 5 Then '筛选5年以上的数据
            sstr = target.Sheets("sheet8").Cells(i, 1)

                With Worksheets(3).Range("b:b")
                    Set c = .Find(what:=sstr)
                    If Not c Is Nothing Then
                        firstAddress = c.Address
                        Do
                            r = c.Row
                            target.Sheets("sheet3").Rows(r).copy target.Sheets("sheet9").Cells(m, 1)
                            m = m + 1
                            Set c = .FindNext(c)
                        Loop While Not c Is Nothing And c.Address <> firstAddress
                    End If
                End With
        End If
    Next

End Sub
本文主要介绍了 Android 系统调用 Camera 实现扫码的过程解析。
decodeThread.start();
state = State.SUCCESS;
// Start ourselves capturing previews and decoding.
CameraManager.get().startPreview();
restartPreviewAndDecode();
state = State.PREVIEW;
CameraManager.get().requestPreviewFrame(decodeThread.getHandler(), R.id.decode);
CameraManager.get().requestAutoFocus(this, R.id.auto_focus);
fragment.drawViewfinder();
Message message = previewHandler.obtainMessage(previewMessage, cameraResolution.x,cameraResolution.y, data);
message.sendToTarget();
if (rawResult != null) {
    long end = System.currentTimeMillis();
    Log.d(TAG, "Found barcode (" + (end - start) + " ms):\n" + rawResult.toString());
    Message message = Message.obtain(fragment.getHandler(), R.id.decode_succeeded, rawResult);
    Bundle bundle = new Bundle();
    bundle.putParcelable(DecodeThread.BARCODE_BITMAP, source.renderCroppedGreyscaleBitmap());
    message.setData(bundle);
    //Log.d(TAG, "Sending decode succeeded message...");
    message.sendToTarget();
} else {
    Message message = Message.obtain(fragment.getHandler(), R.id.decode_failed);
    message.sendToTarget();
}
if (message.what == R.id.decode_succeeded) {
        Log.d(TAG, "Got decode succeeded message");
        state = State.SUCCESS;
        Bundle bundle = message.getData();
        Bitmap barcode = bundle == null ? null :
                (Bitmap) bundle.getParcelable(DecodeThread.BARCODE_BITMAP);

        fragment.handleDecode((Result) message.obj, barcode);

} else if (message.what == R.id.decode_failed) {

        state = State.PREVIEW;
        CameraManager.get().requestPreviewFrame(decodeThread.getHandler(), R.id.decode);